Most rides in Boulder do not respect the calendar. You roll out at 6:40 in the morning into 44 degrees of shade, climb into sun, and by the second hill you are at 68 and reaching for the zipper. That is the exact window a long sleeve cycling jersey was built for, and it is also the piece most riders buy wrong: too heavy, too loose in the pockets, or cut so short in the front that it rides up the moment you get into the drops.
The other half of the equation is your head. A helmet with a magnetic sun visor does double duty in shoulder season, blocking low morning sun and afternoon glare without the sunglasses-and-strap shuffle at every stoplight.
This is how I set up both pieces, in the order I do it at the bench: fit the helmet first, then size the jersey around the body position you actually ride in, not the one you stand in at the register.
Why you should trust me
I started at 19 sweeping the floor of a bike shop and never left. Twelve years as a mechanic, five as service manager, and now I run a one-bay shop called Mitch's Bench where I rebuild hubs, fit saddles, and torque everything to spec, because "hand tight" is how expensive things get loose. I still ride 15,000 km a year, most of it before 7 a.m. or after 6 p.m., because the shop owns the day.
The measurement habit came out of the service bay. Almost every customer complaint about fit turns out to be a measurement problem: a strap that was never set, a jersey bought by shirt size instead of chest size, a visor that was never seated properly. So I measure, I write the numbers down, and I tell people what to check before they ride instead of after.
How I picked the two pieces here
Jerseys and helmets are the two items I see come back most often, and almost never because they failed. They come back because they were sized wrong, or because one feature did not do what the buyer assumed it did.
So here is what I look at. On a jersey: the pocket layout, because three open pockets plus one zippered pocket is the difference between carrying a phone safely and watching it bounce down a descent. The zip length, because a half zip vents at the chest and nothing else. The sleeve length at full extension on the bars. The fabric weight, because a long sleeve that traps heat is worse than a short sleeve with arm warmers. And the UPF rating, which is a fabric rating and not a license to skip sunscreen on your neck and ears.
On a helmet: the retention system, the strap anchors, the coverage at the back of the skull, and whether the visor is a real attachment or a friction fit that will rattle. Also whether the pads are replaceable, because pads are the first thing to die and the helmet is worthless once they are gone.
What follows is the setup sequence, plus the two pieces I would start with for this kind of riding.
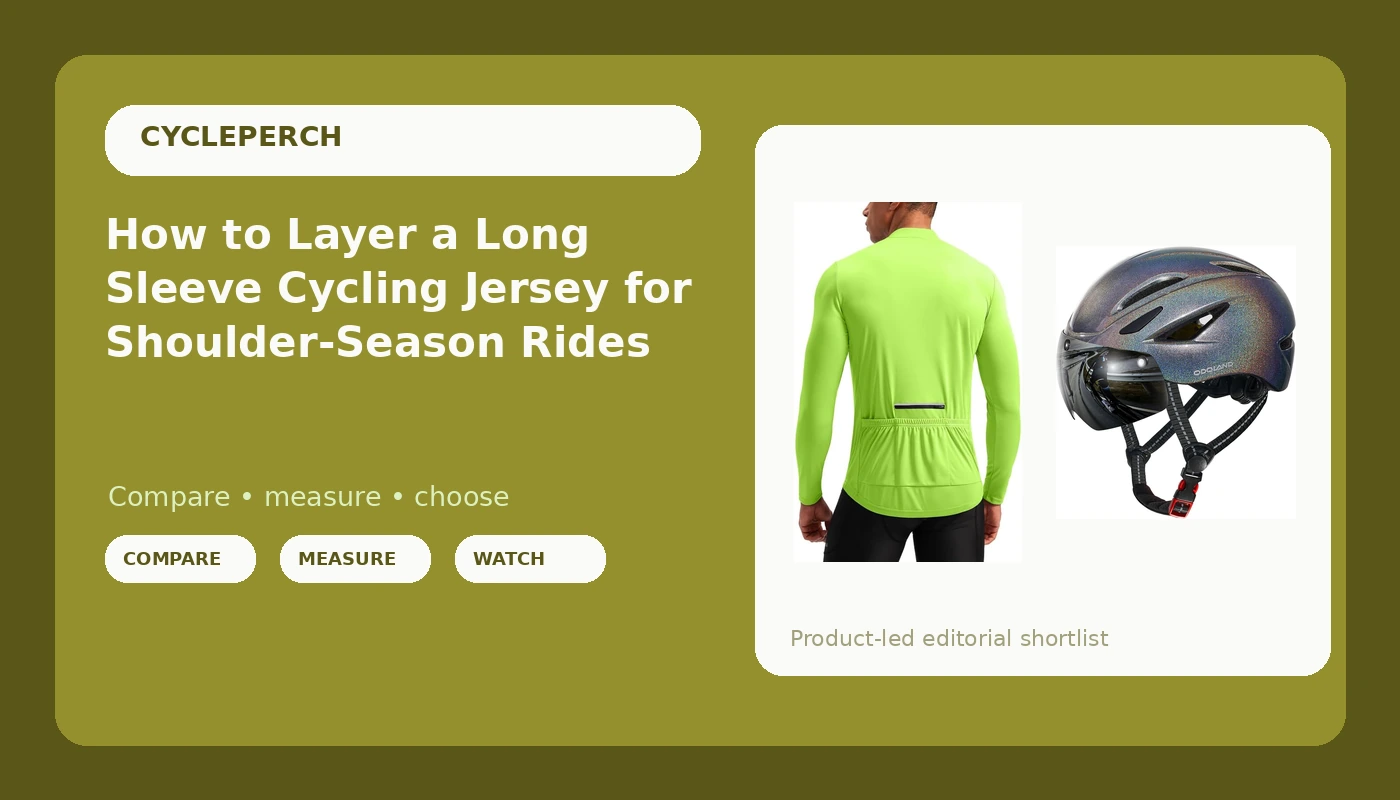
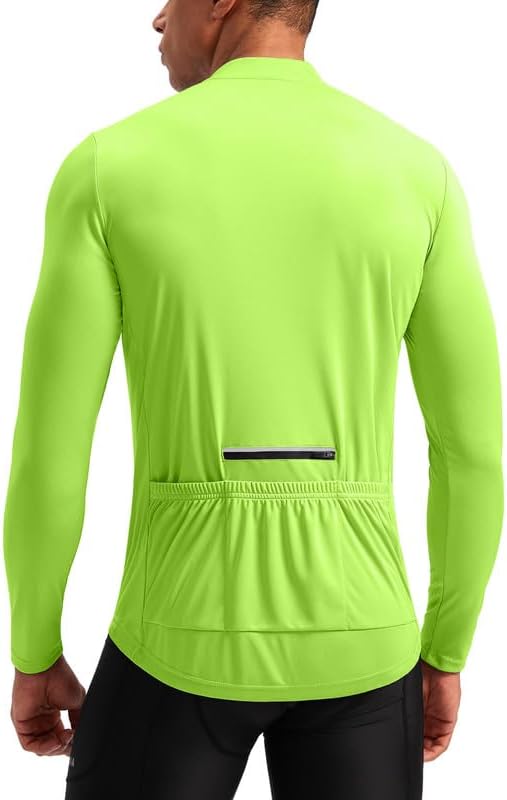
Our pick: Bikewa Men's Cycling Jersey with 3+1 Rear Zipper Pockets Long Sleeve Moisture Wicking UPF 50+ Half Zip Riding Bike Shirts
 Visit on Amazon →
This is the piece that covers the widest range of shoulder-season conditions. The 3+1 pocket arrangement gives you three open pockets for food and a shell, plus one zippered pocket for keys and a phone, which is the layout I want on anything I am wearing from 45 degrees to 70. The long sleeve handles the cold start without a separate arm-warmer ritual, the moisture wicking fabric moves sweat off your back on the climb, and the UPF 50+ rating matters more than people think on a long exposed descent in full sun.
The half zip is the honest compromise. It vents from the collar to mid chest, which is enough for most temperature swings, but it is not a full zip, so you cannot open the whole front on a hot climb the way you can with a summer jersey.
Flaws but not dealbreakers: A long sleeve jersey is a one-piece decision. Once it is on, you cannot dump the sleeves, so on a day that starts at 45 and finishes at 80 you will want a vest or a lighter base layer rather than a heavier jersey. And UPF fabric only protects what it covers, so sunscreen still goes on your neck, ears, and hands.
Check current Amazon price before you order, and size from your chest measurement rather than your T-shirt size.
The head half of the kit: Odoland Adult Bike Helmet with Magnetic Sun Visor for Men Women for Cycling
 Visit on Amazon →
The magnetic sun visor is the feature that earns this one a place in the shoulder-season setup. Low morning sun through bare trees is genuinely hard to ride through, and a visor you can snap on and pull off with one hand beats juggling sunglasses at a stop sign. The magnetic attachment also means you can run it for the shaded first hour and pocket it when the sun climbs.
As with any helmet, the fit is what matters. It needs a retention system you can adjust one-handed with gloves on, strap anchors that sit in the right place below the ear, and enough rear coverage to be worth wearing. Pads are the wear item, so check that they come out and go back in without tearing.
Flaws but not dealbreakers: A visor is not eye protection. It cuts glare and blocks direct sun, but it does nothing about wind, road grit, or a bee at 25 mph, so keep glasses on underneath. And a tinted visor on a dusk ride is a visibility problem, not a feature. Take it off when the light goes flat.
Check current Amazon price, and measure your head before you pick a size.
The fit sequence: how to set up both pieces
Do this in order. Getting the helmet right first means you are not fighting strap adjustments later with a loaded jersey on.
Step one: Measure your head. Run a soft tape around your skull about an inch above your eyebrows, keeping it level all the way around, and write the number down in centimeters. Do it twice. Head circumference is the only number that picks a helmet size, and it is the one number people guess.
Step two: Set the helmet level, not tilted back. The front edge should sit just above the eyebrows, roughly parallel to the ground. A helmet tipped back exposes the front of your skull and it is the single most common thing I fix at the bench. Then tighten the retention dial until the helmet moves with your scalp when you raise your eyebrows, and set the straps so they form a V just under each ear.
Step three: Check the chin strap. Snug enough that you can fit one finger between the strap and your chin, tight enough that the helmet does not shift when you open your mouth wide. If you can push the helmet off your forehead with your palm, the strap is too loose.
Step four: Seat the visor and test it. Snap the magnetic visor on, then tug it in four directions. Ride a rough patch and listen. If it rattles or shifts, it is not going to stay put at speed, and a visor that rotates on impact is worse than no visor.
Step five: Measure your chest and pick the jersey size from that. Jersey sizing runs on chest circumference, not shirt size, and long sleeve jerseys are less forgiving because a tight shoulder pulls the hem up. If you land between two sizes, take the larger one.
Step six: Load the pockets the way you ride. Heavy items low and centered, phone and keys in the zippered pocket. A jersey that sags at the hem is almost always a loading problem, not a sizing problem.
Step seven: Layer for the start, not the middle. A thin base layer under the jersey handles the first 30 minutes. Carry a vest, not a second jersey, for the temperature swing. Arm warmers do not work over a long sleeve, so a vest is your only real on-the-fly adjustment.
Step eight: Do the driveway check. Helmet on, straps set, jersey loaded, ten minutes around the block. Anything that rubs, rattles, or rides up will show itself in the first mile, not the first hour.
The first 100 km: what to check
The first 100 km tells you whether a piece works. The next few thousand tell you whether it was worth it. Here is what I actually watch for.
Pocket sag. If the rear pockets are drooping by the end of a two-hour ride, you are either overloading them or the jersey is a size too big.
Zipper creep. A half zip that works its way down on its own means the slider is not holding. Check it early, because it only gets worse.
Shoulder and seam rub. Long sleeve jerseys chafe where the sleeve meets the shoulder if the cut is too tight across the back. If you feel it at 30 km, you will feel it at 100.
Strap rub and pad compression. Helmet pads pack down over the first month. When the helmet starts feeling loose without you touching the dial, that is pad compression, not a broken retention system.
Visor behavior. Check the magnets after every wash and after any ride where you clipped a branch. Magnets are reliable until they are not, and the failure mode is a visor in your lap.
Cold mornings, warm afternoons: adjusting without stopping
The half zip is your thermostat. Open it on the climb, close it on the descent, and let your base layer do the rest. On the days that swing hard, a vest over the jersey is the better answer than a heavier jersey, because you can take a vest off at a light and stuff it in a pocket.
On the head, the sequence is visor on for the shaded first hour, visor off when the sun is high or when you hit a fast descent where you want maximum field of view. And if the ride is going to finish in flat light or after dark, the visor comes off entirely and the clear glasses stay on.
Mistakes I see at the bench
A helmet tipped back so the forehead is exposed, which defeats the entire point of wearing it.
A jersey bought one size small because it looked better in the mirror. It will drag the pockets up and the hem down, and you will blame the jersey.
Straps set once at the shop and never adjusted again. Straps need a tweak every few weeks as the pads compress.
Sunscreen skipped because the fabric says UPF 50+. The rating covers the fabric, not your ears, neck, and hands.
A tinted or dark visor left on for a dusk ride. Take it off. You need to see the road more than you need to block a sun that is already down.
Washing wicking fabric with fabric softener, which coats the fibers and kills the moisture movement you paid for. Cold wash, gentle cycle, hang dry. No dryer sheet, no high heat.
What to buy first, and how to make both last
Buy the helmet first. Fit and coverage are the two things that matter most on a bike, and a helmet that fits badly is a helmet you will not wear. Then buy the jersey, sized from your chest measurement, in a weight that matches the temperature range you actually ride in rather than the one you wish you rode in.
Both pieces last if you treat them right. Wash the jersey cold and hang it dry, and check the rear pockets for stitching pulls once a season. On the helmet, pull the pads and wash them by hand, check the retention dial hardware for looseness, and retire the whole helmet after any real impact, because the shell can look fine while the foam underneath is done. Check the visor magnets every time you wash the jersey, since that is when they go missing.
The bottom line
Shoulder season does not need a jacket and it does not need a full winter kit. It needs a long sleeve cycling jersey you can vent, a base layer you can tune, and a helmet that keeps the low sun out of your eyes and stays put when you hit a pothole. Fit the helmet to a measured head circumference, size the jersey to a measured chest, load the pockets properly, and ride the first 100 km paying attention to what rubs and what sags.
The gear does not make the ride. The fit does. Measure twice, torque to spec, and go ride.